Supply Chain Simulator
Last updated on 27th January 2026
Overview
The Supply Chain Simulator is a sample model provided and developed by Simudyne for the purpose of demonstrating how a modeller might use the Supply Chain Toolkit to develop a simulation of a supply chain.
The following docs will be broken up into the below sections:
- Introduction to Model Concepts
- Model Components
- Scenario & Strategy Analysis
- Custom Dashboard
Each section will reference the code available at the link below. Be aware that some environments might require installing Java and Python libraries to run the model, and the custom dashboard included in the package.
Download Model FilesIntroduction to Model Concepts
The supply chain model is an example of a pull system built with the Supply Chain Toolkit released in version 2.6. The purpose of this model is to demonstrate how a supply chain network model that contains customers, warehouses, and production facilities.
This sample model contains many of the necessary components, communication loops, and mechanisms that would be found in a larger production-like system.
An agent-based framework of this type provides the user with the means to explore a wide range of problems and optimizations to a supply chain network, such as facility placement, alternative transport mechanisms, fulfillment strategy design, inventory placement, automation, etc.
In this particular model, the structure is initialized by ingesting some dummy data that includes facility information, like the geographical locations and names of those facilities, and the topographical information that is used to define how the facilities are connected to one another (routes between the facilities).
This defines the distribution network. To connect the distribution network to the end customer, we introduce a MarketPlace agent where customers can send orders based on their own internal spending preferences and warehouses can share the current state of their inventory. This market mechanism acts as a centralized place where different kinds of prioritization or optimization algorithms could be applied.
To summarize, the communication loop during a step of the simulation begins with customers sending orders and warehouses sharing inventory, orders are matched at the marketplace, which feeds into fulfillment at the warehouse, and the passing on of demand information to the production facilities. Customer orders drive demand at the production facility, in this respect we can define the system as a "pull" system.
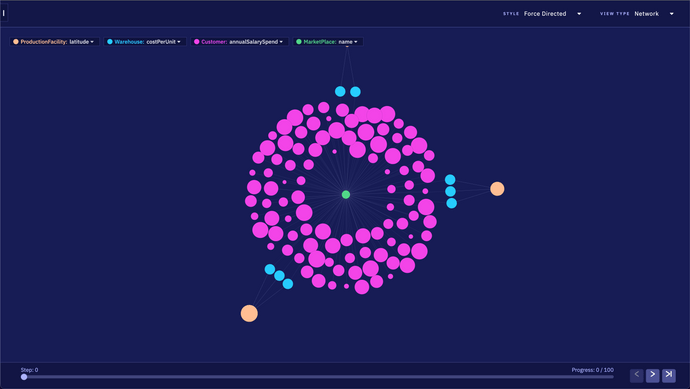
Below is a screenshot from the Network view in the Simudyne Console:

For the purposes of experimentation, the framework provided has been generated with limited production facilities and warehouses serving a geographically diverse group of customers located in the United States. This design is intentional and intended to provide the user with an opportunity to test various strategies or optimizations in the simulation environment.
The next section will cover the core modelling components and interactions within the Supply Chain Simulator.
Model Components
The Supply Chain Simulator is designed to represent a "pull" system in which end customers (which could be individuals, organizations, businesses, etc) generate demand which impacts inventory and production at the production facilities.
In this section the agent classes, functional classes, and interactions of the simulation are explained. It is recommended to dive into the code to best understand how everything operates.
Model Setup
During the setup() input data is pulled into the simulation to generate various agent classes, and to generate the topology between the agents. These data files are placeholders to demonstrate how real data might be used to generate the agents and their environment.
SupplyChainModel.java
  @Override
public void setup() {

        getGlobals().rng = getContext().getPrng();

        // Pull in available products and store in the Globals
        CSVSource products = new CSVSource("data/products.csv");
        products.getRows().forEach(entry -> {
            String productID = entry.get("Product Code");
            double price = Double.parseDouble(entry.get("Price"));
            double volume = Double.parseDouble(entry.get("Volume"));
            double weight = Double.parseDouble(entry.get("Weight"));
            getGlobals().availableProducts.put(productID, new ProductDetails(productID, price, volume, weight));
        });

        // Pull in customer information for regions and income distribution
        CSVSource customerRegions = new CSVSource("data/zip1regions.csv");
        getGlobals().zipRegionData = customerRegions.getRowsFromTable();
        EmpiricalDistribution incomeDist = new Distribution().getIncomeDistribution();

        // Generate the marketplace agent
        Group<MarketPlace> marketPlaceGroup = generateGroup(MarketPlace.class, 1, m -> {
            m.availableProducts = getGlobals().availableProducts;
        });

        // Generate a customer population
        Group<Customer> customerGroup = generateGroup(Customer.class, getGlobals().nbCustomers, customer -> {
            customer.region = getGlobals().determineCustomerRegion();
            customer.income = (int) incomeDist.sample(1)[0];
            customer.annualSalarySpend = customer.getPrng().uniform(0, getGlobals().annualSpending).sample();
            customer.availableProducts = getGlobals().availableProducts;
        });

        Map<String, Long> destAddr = new HashMap<>();

        // Generate the production facilities based on synthetic data
        CSVSource factorySource = new CSVSource("data/factory_source.csv");
        Group<ProductionFacility> factoryGroup = loadGroup(ProductionFacility.class, factorySource, fA -> {
            fA.outboundLoadingBay = new LoadingBay(2);
            fA.HEADER = "facility_name,productID,production,timeStep";
        });

        // Generate the warehouse agents based on synthetic data
        CSVSource warehouseSource = new CSVSource("data/warehouse_source.csv");
        Group<Warehouse> warehouseGroup = loadGroup(Warehouse.class, warehouseSource, fB -> {
            fB.inboundLoadingBay = new LoadingBay(2);
            destAddr.put(fB.name, fB.getID());
            fB.HEADER = "facility_name,productID,demand,inventory,timeStep";
        });

        getGlobals().warehouseLocations = destAddr;

        // Connect the production facilities to the warehouses that they supply
        CSVSource distroTopology = new CSVSource("data/distribution_topology.csv");
        factoryGroup.loadConnections(warehouseGroup, Links.FactoryToWarehouseLink.class, distroTopology);

        // Connect the warehouses back to the production facilities so they can communicate their demand
        CSVSource demandTopology = new CSVSource("data/demand_topology.csv");
        warehouseGroup.loadConnections(factoryGroup, Links.WarehouseToFactoryLink.class, demandTopology);

        // Connect customers and warehouses to marketplace
        warehouseGroup.fullyConnected(marketPlaceGroup, Links.WarehouseToMarketPlaceLink.class);
        customerGroup.fullyConnected(marketPlaceGroup, Links.CustomerToMarketLink.class);

        super.setup();
}
The setup() generates all agents and establishes the links between the various facilities.
Model Step
The step() method contains the 3 messaging sections with run sequences for handling the communication and flow of products between the customers and the distribution facilities.
@Override
    public void step() {
        super.step();

        // Generate initial state of inventory
        firstStep(ProductionFacility.sendInitialInventory, Warehouse.setInitialInventory);

        // MarketPlace functionality and generation of demand
        run(
                Split.create(
                        Customer.generateOrders,
                        Warehouse.sendInventory),
                MarketPlace.matchOrders,
                Split.create(
                        Warehouse.processOrders,
                        Customer.receiveOutOfStockMessage),
                Split.create(
                        ProductionFacility.receiveDemand,
                        Customer.receiveOrderUpdate)
        );

        // Production of new products and distribution from production facilities to warehouses
        run(ProductionFacility.processOutboundLoadingBay);
        run(ProductionFacility.departOutboundTransport, Warehouse.receiveInboundTransport);
        run(Warehouse.processInboundLoadingBay);

    }
The intial firstStep() sequence establishes an initial state of inventory at the warehouses. This is controlled by a GlobalState parameter called initialInventory.
The next sequence handles the communication of orders from customers and inventory from the warehouses. These are matched at the marketplace and anything out of stock is communicated to the customer and anything fulfilled is sent to the customer and, the demand is sent to the production facility. Lastly, customers receive their orders and production facilities receive the demand information.
The final set of run sequences are standard in the Supply Chain Toolkit and handle the response to demand by generating products and shipping them to warehouses which store them in inventory.
The next subsections dive deeper into the agents and their behaviors.
Agents
The simulation has 4 different agent classes:
- Customer Agent: Generates orders based on internal spending behavior and sends them to the
MarketPlaceagent. - MarketPlace Agent: Receives
OrderMessagefrom the Customer andInventoryMessagefrom warehouse and matches orders. - Warehouse Agent: Receives
WarehouseOrdermessages from theMarketPlaceand fulfills the orders. Additionally, receives incomingTransportMessagemessages from theProductionFacilityand stores the newProductobjects in inventory. - ProductionFacility Agent: Receives
DemandMessagefrom theWarehouseagent and responds to demand by predicting future production and generating future inventory. Ships inventory toWarehouseagents once generated.
These agent classes contain behaviors that are defined and serve as placeholders for how interactions in a real-world system may operate.
In the following subsections the core behaviors of the agents are explained.
Customer Agent
The customer agent has 3 main Actions that are called in during the step() of the model:
Customer.generateOrderscalls internal allocation functions within the agent that determine which products to purchase and how much to spend on those products. These orders are then sent toMarketPlaceagent.Customer.receiveOutOfStockMessagereceivesOutOfStockMessagefrom theMarketPlaceand processes the refund.Customer.recieveOrderUpdatehandles incoming fulfilled orders and saves the information in the purchase history.
MarketPlace Agent
MarketPlace.matchOrders takes in OrderMessage and InventoryMessage and matches available inventory with incoming orders. These are sent to the Warehouse where they are fulfilled and their demand is captured and where anything that is out of stock is sent back to the customer for a refund.
Warehouse Agent
Warehouse.setInitialInventorytakes in the initial inventory sent by theProductionFacilityand creates the initial state of the inventory.Warehouse.sendInventoryshares aInventoryMessagewith theMarketPlacefor providing the latest inventory for the matching process.Warehouse.processOrdersreceivesWarehouseOrderMessageand fulfills orders by sending to customers and updating inventory. In this behavior the demand for eachProductis sent to theProductionFacility.Warehouse.receiveInboundTransporttakes inTransportMessagewithProductcargo and handles the incoming transport.Warehouse.processInboundLoadingBayunloads arrivedTransportMessageand places theProductobjects in inventory.
The Warehouse serves as the point of fulfillment and inventory storage.
Production Facility Agent
ProductionFacility.sendInitialInventorycreates an initial set of products, it is implemented as a constant number from theGlobalStatefor each facility and for each product. Once products are generated they are immediately sent to the respectiveWarehouseProductionFacility.receiveDemandtakes inDemandMessagefrom theWarehouseand stores this information in its historical demand so that it can use this to make predictions about production.ProductionFacility.processOutboundLoadingBaylooks at historical demand and generatesProductobject based on predicted production. Once products are ready to load onto trucks, the agent generates trucks and loads the contents headed to respective destinations.ProductionFacility.departOutboundTransportdepartsTransportMessagethat are ready to leave and head to theirWarehousedestination.
The ProductionFacility serves as the point of production and shipment as well as the location where production is predicted.
Scenario & Strategy Analysis
The purpose of this framework is to provide a sandbox environment for solving supply chain optimization challenges. By using a simulation environment that is a faithful representation of the mechanics of the real world, optimization challenges like inventory placement and facility placement can be explored.
There may be objectives or goals involved in these optimization exercises, such as reducing cost of shipment or storage time that lead to real-world balance sheet implications. A robust simulation environment, coupled with the testing of optimization strategies can help identify potential cost-saving or profit-making outcomes.
In this example a very simple optimization is used for predicting production. A simple linear regression is implemented that looks at the last 30 days of historical demand and predicts what the next 30 days of production should look like. This is just a placeholder for more complex algorithms and only addresses production forecasting. The MarketPlace agent is likely a better location to run optimizations should this model be adapted or extended for an inventory placement or facility location problem.
public void calculateFutureProduction() {
        Map<Long, List<DemandHistory>> last30DemandByWarehouse = new HashMap<>();

        //Collect the last 30 days of historical demand
        for (Long step : historicalDemand.keySet()) {
            for (DemandHistory demandHistory : historicalDemand.get(step)) {
                long warehouseID = demandHistory.warehouseID;
                last30DemandByWarehouse.putIfAbsent(warehouseID, new LinkedList<>());
                last30DemandByWarehouse.get(warehouseID).add(demandHistory);
                if (last30DemandByWarehouse.get(warehouseID).size() > 30) {
                    last30DemandByWarehouse.get(warehouseID).remove(0);
                }
            }
        }

        last30DemandByWarehouse.entrySet().stream().forEach(entry -> {
            Map<String, List<Integer>> last30Demands = new HashMap<>();
            for (DemandHistory demandHistory : entry.getValue()) {
                String productID = demandHistory.productID;
                int demand = demandHistory.demand;
                last30Demands.putIfAbsent(productID, new LinkedList<>());
                last30Demands.get(productID).add(demand);
            }

            Map<String, Double> regressionCoefficients = new HashMap<>();
            Map<String, Integer> intercepts = new HashMap<>();

            //gather regression coefficients and intercepts
            for (String productID : last30Demands.keySet()) {
                List<Integer> demands = last30Demands.get(productID);
                SimpleRegression regression = new SimpleRegression();

                for (int i = 0; i < demands.size(); i++) {
                    regression.addData(i, demands.get(i));
                }

                regressionCoefficients.put(productID, regression.getSlope());
                intercepts.put(productID, (int) regression.getIntercept());
            }

            long currentStep = getContext().getTick();

            //store future production predictions
            for (String productID : regressionCoefficients.keySet()) {
                double slope = regressionCoefficients.get(productID);
                int intercept = intercepts.get(productID);
                for (int i = 1; i <= getGlobals().prodPredictionTime; i++) {
                    long futureStep = currentStep + i;
                    int predictedDemand = calculatePredictedDemand(slope, intercept, i);
                    productionPredictions.computeIfAbsent(futureStep, k -> new ArrayList<>()).add(new Production(productID, predictedDemand, entry.getKey()));
                }
            }
        });
    }
Custom Dashboard
In a production environment the Simudyne SDK is usually run in headless mode, this means that the Simudyne Console is usually bypassed for the purposes of speed and scale.
Under these circumstances sometimes it can be helpful to display information with a visualization layer like a custom dashboard. This can also be a useful way to inspect outcomes and communicate business value.
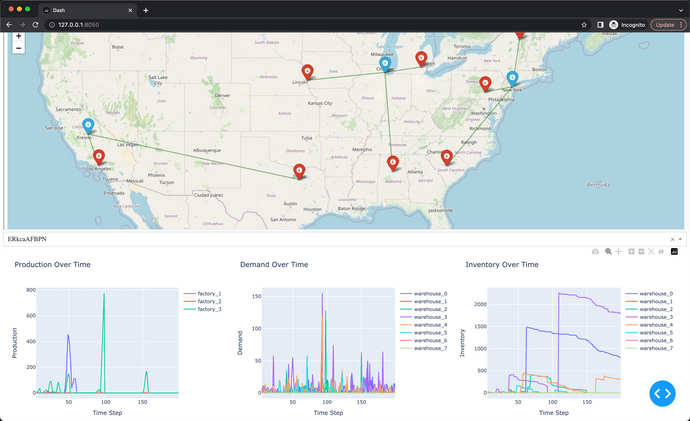
A sample dashboard, built in Python, has been provided for the purposes of demonstrating the art of the possible and how these simulation environments can be exposed to a more user-friendly interface for interacting with the simulation and viewing the results.
The code for this dashboard is provided in the model files that can be downloaded above under the python directory.
Below is a screenshot of the dashboard view:
