

Run & Deploy
Last updated on 21st April 2026
One of the core strengths of the Simudyne SDK is it's adability to work within existing organisations for whatever sort of setup they have in both development and production environments. As simulation software it's imperative that the ability to provide input and output as part of a data pipeline is included. Through the multiple avenues you can take with the Simudyne SDK to run your simulations there's no limit to how it can be used.
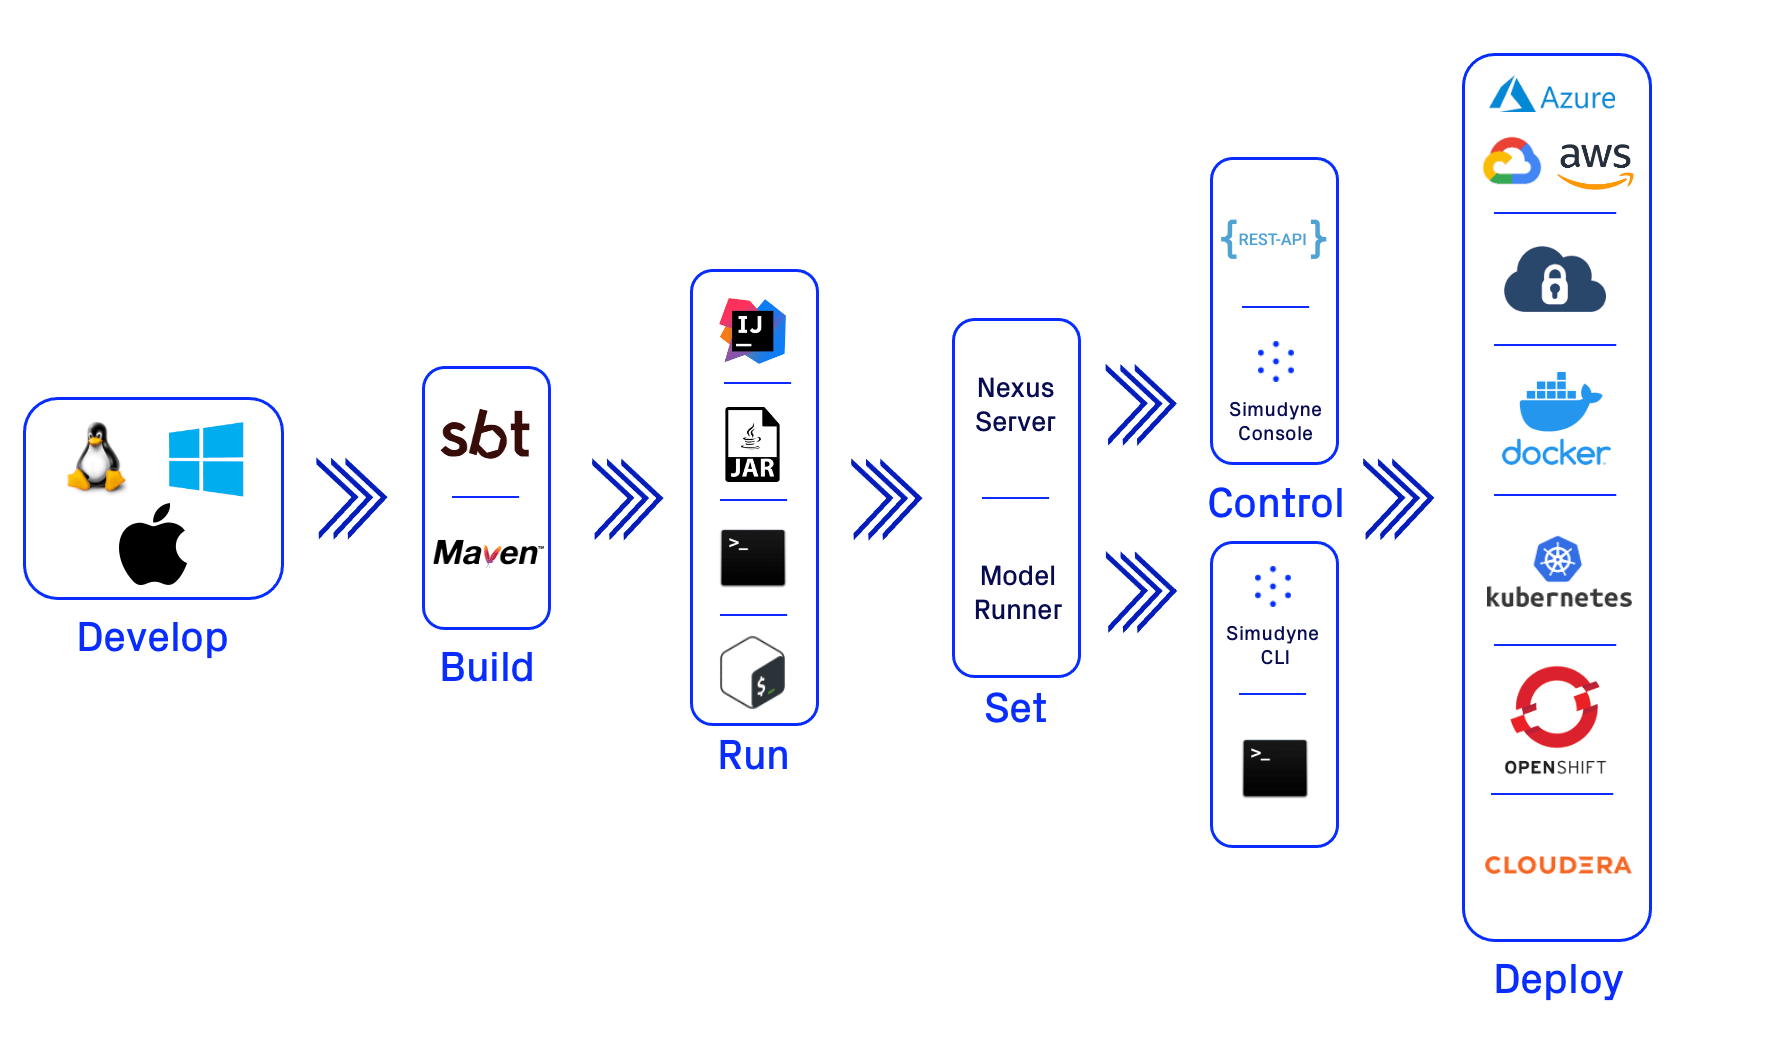
Develop
Because your model needs to be created and written in Java on the Simudyne SDK before you can move into your final production environment your modellers/developers/SMEs will need to start by building oiut your model on their workstations. For more info on how to get started developing on different operating systems either refer to the sections below or to our Setup Page
On either Platform you are free to develop using either your favorite IDE (IntelliJ/Eclipse/etc) or edit your files in any text editor running via whichever method below is suitable.
On Windows
The only consideration to take for developing on Windows is to ensure that your JDK has been added to your path. As well if you are going to be working with Parquet files you'll want to follow the steps on Parquet Output to install the relevant Hadoop utilities.
On Mac
There are no special requirements when working on a Mac system
On Linux
There are no special requirements when working on a Linux system
Build
The Simudyne SDK exists as a series of libraries made available via our Artifactory. In order to get these libraries and to use them in your Java project you'll need to make usage of a build tool. The recommended tool for most users as documented on the rest of the site is through Maven. We also support SBT due to the Scala-based toolset the SDK is built on.
via Maven
To get started building with Maven refer to the Github Quickstart Repo. There it will provide some sample demo models, project scaffolding, and a Readme on how to use Maven to build your model. Note: you will need an access token and license - see Access for more.
via SBT
To get started building with Maven refer to the Github Quickstart Repo. There it will provide some sample demo models, project scaffolding, and a Readme on how to use Maven to build your model. Note: you will need an access token and license - see Access for more.
Run
There are multiple ways once the simulation has been built to kickoff the simulation. Note that running the simulation and controlling it are not one in the same as there are APIs provided that may differ. This means you are allowed to run the simulation from say a server and provide endpoints to users on other machines to control it.
From IntelliJ
While any Java Integrated-Development-Environment (IDE) will work with Maven or SBT, and could be used in the development, build, and running of your model - we recommend IntelliJ.
IntelliJ need only be configured to point to either you build.sbt or pom.xml file, and to either a .credentials or settings.xml file that contains your access token. From there it's as simple as clicking Run on the Main.java class.
From Command Line
Working with Maven or SBT you can run simple commands to start your simulation in whichever mode it exists in (console, headless, CLI, etc). For more info on how to do this please refer to either the Maven or SBT quickstarts
From a Script
Since you can run the simulation from a command line it's relatively simple to create either a Bash script (for working with Linux or Mac), or a Batch file on Windows. Entry into this script can either be after you've packaged it into a jar, or via the Maven and SBT build tools.
From a Jar File
Because the resulting codebase is written in Java with a simple tweak to your build process you can run a package command to create a singular Jar file that contains all dependecies. Alongside a properties and license file you can run this Jar file from any machine you want, and even script it for other deployments. For info on creating this Jar refer to the Local Server for configuration.
Set
When running your Main.java you must choose to set one of the 2 main modes that the simulation can exist as that will determine the available Control options. Within these modes are multiple methods for operating and handling your simulation, and there is nothing stopping you from using both at the same time; however certain control options will only be available to certain modes.
to use Nexus Server
Registering your model with the Nexus server is what exposes the REST API and web console to your models. While you can run REST API commands via curl or other command line methods - the primary focus of working in this mode is to connect to either the web or your existing software.
to use Model Runner
The ModelRunner is a Simudyne SDK class that allows you to work to define your model with different definitions such as Batch/Interactive/Model Sampler/Scenario and run them directly in Java. This mode removes the connection to a REST API and web console opting to run 'headless'. Because the output can be controlled and placed where configured you can therefore run this without any need for a browser, directly from any command line or scripting interface.
Control
Once your simulation is running, and depending on the mode you are running (either with the Nexus server, or the Model Runners) you are then able to control your simulation through various means.
with the built-in Web Console
By default the tutorials and quickstart models will have you register your model with the Nexus server. This server exposes a REST API that is then consumed by our own internal Web Console. The console provides built in controls for initialising, running, batch-runs, stopping, and restarting your model. It even allows the abilty to register multiple models and switch easily between them.
with the REST API
As with the Console, usage of the default server mode will allow you to control the simulation with a REST API. This can be done through whatever dashboard or built-in software your are using, or even with some simple command line POST/GET commands if said interface is still in development. Once the server is running how you expose and then make usage of this API is up to you. For info on the REST API refer to either a simple example or to the API itself
with Command Line Arguments
Because the Main.java class is bog-standard Java with the Nexus/Modelrunners being exposed as needed - you have the ability to create your own command line arguments to control the simulation. These arguments can be used to inform the initialisation of your simulation such as locations for input or run-mode, or as with other Java programs can be crafted to allow for input mid-run to make changes or alterations to how you wish to run your simulation.
with the CLI (Command Line Interface)
In order to facilitate working with the Command Line, the SDK provides a built-in interface that can handle most common actions that you would require using the simulation, without the need to write out your own Java program. For more info refer to the CLI documentation
Deploy
Finally once you've built your model, and set out how it should be controlled to work within your existing simulation and data pipeline you have a myriad of options available on how to deploy it. Whether this is on local machines, a cluster in your organization, or through cloud services your only constraint is Java.
to a Local/Remote/Cloud Server/VM
Whether it's run and controlled with the browser, the REST API, the command line, or a script there's no limit to how you can choose to deploy to a Virtual Machine either locally, remote, on the cloud, behind a VPN, and more. Because it's Java you're able to run from essentially any environment as needed regardless of what your development environment is. Please refer to the guide here
to a Hadoop/Spark Cluster
The Simudyne SDK is built with Spark libraries such that you can scale your model one of two ways. Either horizontally via batch runs and Monte Carlo, or vertically by distributing the underlying graph computation of the Agent-Based-Model. The only requirements are Hadoop, Yarn, and Spark 3.2+ (with Hive being optional). Please start with our page on Distributed Computation to get started.
to a Docker Container
With the ease of use in Java, it's fairly simple to modify your build environment to automatically generate a Dockerfile to be made available to Docker Hub or your own Container Registry. Once there it's as easy to deploy as Docker is. Please refer to the guide here
to a Kubernetes Cluster
Via usage of Docker containers you are therefore able to deploy your model to a Kubernetes cluster. This allows you to ensure that no matter the load of your users you can maintain uptime and availablity scaling out horizonatally the instances of your model. Please refer to the guide here
to an Azure Web App Service
While there's multiple ways you can deploy to the cloud on Azure, or AWS, or Google via Virtual Machines and services, we provide a detailed guide on how easy it is to go from a Git repository of your model to an available website that anyone around the world can run and test your model. Please refer to the guide here
to anywhere
Because the SDK is built in Java - whether you are running in a container, on a machine, or a service - anywhere that can run Java through scripts/files/etc can run the SDK. Whether locked-down or freely accessible to all on the cloud the SDK was designed to provide no barriers to how your users wish to run their simulations and make radically better decisions.