Synthetic Market Challenge
Last updated on 16th July 2024
Building a Synthetic Market
Before beginning this assignment it is recommended that you build or at the least review, the Synthetic Market Tutorial
Download Challenge Base Model Download Answer KeyAgent-Based models are a powerful tool in understanding the dynamics of complex adaptive systems. When building an agent-based simulation we want to focus on implementing real-world behaviors that we inject into our agents. Because we are able to create agents with heterogenous attributes and behaviors, we are able to capture some of the complex interactions of the real-world.
The purpose of this assignment is to get you familiar with both the Simudyne SDK and the fundamentals of building an agent-based simulation.
A production-level system will be subject to levels of scrutiny and scientific rigor that we will not hold ourselves to in this exercise. Instead, the objective of this exercise is to familiarize yourself with the SDK and learn how to extend an existing model with new behaviors, agents and complexity.
The goal is for you to complete this challenge with a deeper understanding of how agent-based systems are developed and the kinds of questions that can be answered using this approach.
This exercise should only take you 0.5-1 day of work to complete.
Assignment overview:
- Section I: Understand the base model
- Section II: Learn how to add new traders
- Section III: Adding momentum traders
- Section IV: Adding fundamental traders
- *Section V: Adding your own trader type
*Part V is an additional section should you complete Sections I-IV with significant time remaining. For more advanced users, this is an opportunity to implement your own trading strategies.
Section I: What is a synthetic market?
For this portion of the assignment our goal is to understand how our base model works and decide what we want to accomplish in this challenge. More on that in a second!
A synthetic market is a simulation of a market and its market participants. This means that we have 2 main types of agents, Traders and Markets. Traders can consist of a diverse population of agents with their own trading strategies, aggressiveness, risk aversion, capital, etc. Our Markets can equally contain market structure that is representative of real-world mechanics. For example, we might want to model NYSE and create a continuous double auction trading environment. We could even implement the exact rules of the exchange we're interested in and create a limit order book for all the symbols traded at the exchange.
Our market simulator won't be as complex as a real exchange, however it will reproduce some interesting market behavior. The model you will build will be an extension of the Synthetic Market Tutorial. Download the project files and walk through the code to get an idea of how noise traders function. Once you've walked through the code, run the model and open the console to run the simulation.
Notice that the price formation process is effectively random.
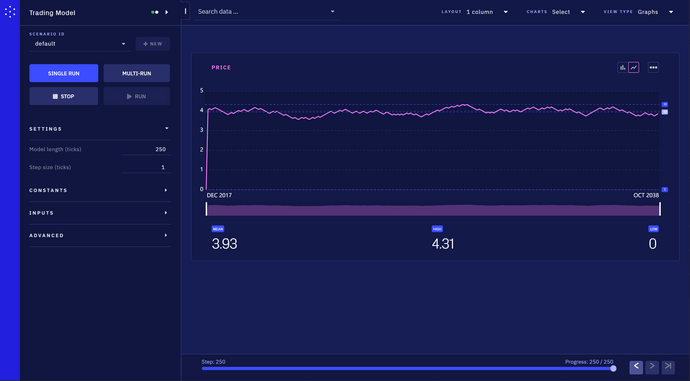
Also have a look at the network view, notice that we have a single market agent and a population of traders surrounding it.
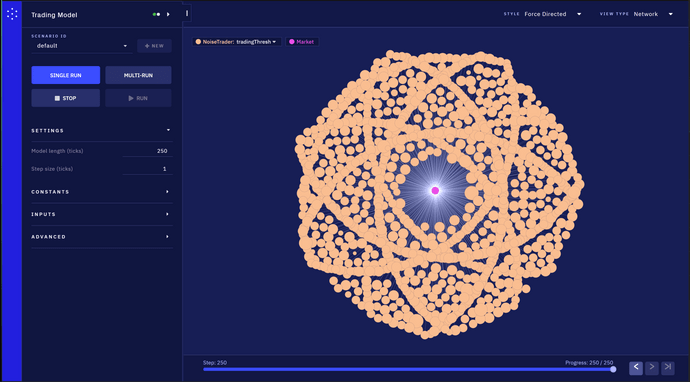
Once you have a good understanding of the behavior and how the model works move on to the next section.
Section II: Adding new traders
The first thing we will do is learn how to add new agents to our system. We will walk through how to complete each of the below steps.
When adding a new agent to our simulation there are a few base steps applicable to any new agents:
- Create a new agent class
- Connect the agent class to the simulation via the GlobalState
- Register the agent in the
init()function
Create a new Java class with your agents name, this can either be an entirely new agent defined like so:
NewAgent.java
public class NewAgent extends Agent<MyModel.Globals> {

}
or, for more advanced Java users, this could extend a base agent if some of your agents have shared functionality:
NewAgent.java
public class NewAgent extends BaseAgent {

}
We have now created our new agent and have connected it to the Global State. The last thing we need to do is register our agent in the init() function in your model class.
MyModel.java
public class MyModel extends AgentBasedModel<MyModel.Globals> {

	@Override
	public void init() {
		registerAgentTypes(NewAgent.class);
	}
}
Now your agent has been connected to the GlobalState and has been registered at the model class. You are now ready to connect your agent to other agents and add in behavior.
Section III: Adding momentum traders
Our goal is to create a more realistic price formation process. Momentum traders will react to trends they see in the market.
This section consists of 4 steps:
- Add a new agent called
MomentumTrader.java - Connect your new trader to the exchange
- Add a moving average trading strategy
- Test that your agent is sending orders and trading properly
Step 1: adding your new trader
Add your new agent using the instructions from the previous section. Name your agent MomentumTrader.java.
Now that you have a new trader agent it is time to connect that trader to the exchange.
Step 2: Connect your trader to the exchange
To generate your traders you will need to generate a new group and add new links in the setup() function. Follow the structure of the existing agents being generated to define your agents.
Once you have generated your group of new Momentum Agents and connected them to the exchange, your network view in the console should look like the graph below:
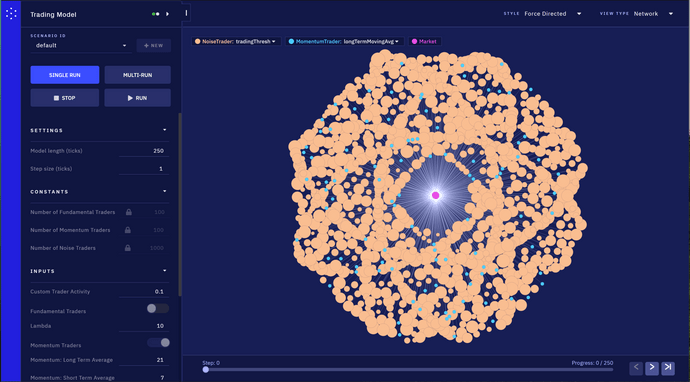
*Note that if you added a new type of Link for your trader to be connected to the exchange you will need to register that in the init() function in your model class as well.
Step 3: Add a moving average trading strategy
There is some shared functionality between the noise traders and your new momentum trader that you can pull into your MomentumTrader.java agent.
Go ahead and move the buy() and sell() functions into your MomentumTrader.java class. If you'd like to, you can also copy the 2 actions in the NoiseTrader.java class into your new class. These can be used as a template for your new momentum behaviors.
Traders in our system in general do 2 things:
- Send orders to the exchange
- Receive information from the exchange about the market
These are the 2 behaviors that need to be defined in our new class.
Implementing a moving average strategy In short, the moving average strategy we will use in our simulation will follow a simple rule: If the short-term moving average crosses the long-term moving average in an upward direction (i.e. from below to above), we buy. If the short-term moving average crosses the long-term moving average in a downward direction (i.e. from above to below), we sell.
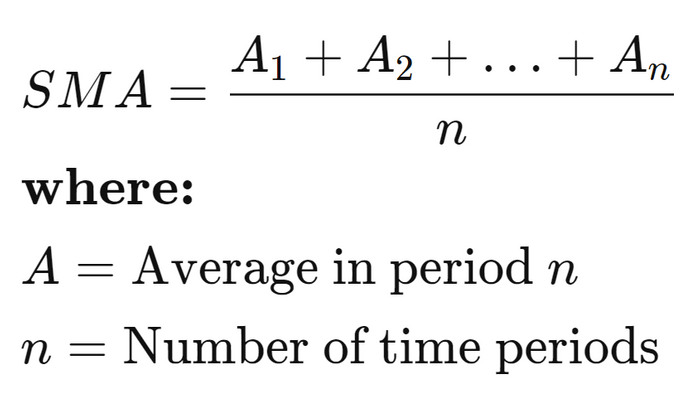
For more information on the theory behind the moving average strategy, check out this useful link Moving Average.
For our moving average strategy to work we must gather historical prices and compute a long term and short term moving average at each step.
Variables and data structures your strategy will need:
- Short-Term Moving Average Look Back Period - This is the number of days of market price data you will use to calculate your short-term moving average (default = 7)
- Long-Term Moving Average Look Back Period - This is the number of days of market price data you will use to calculate your long-term moving average (default = 21)
- Historical Prices - This will contain the information on the step and price at that step (it is recommended you create a
HashMap<Long, Double>to store your data where the key is the tick and the value is the price. At each step you will need to have the market price returned to the trader and stored in your map. - Short-Term Moving Average - This will be our short-term moving average calculated from historical prices. It is recommended that you place this field on your agent and tag it with an
@Variableannotation so it automatically generates a tile in the console. - Long-Term Moving Average - This will be our long-term moving average calculated from historical prices. It is recommended that you place this field on your agent and tag it with an
@Variableannotation so it automatically generates a tile in the console.
Things to take into consideration as you implement:
- This trading behavior can only begin once enough trading days have passed, set a condition to check the the current tick is greater than the Long-Term Moving Average Look Back Period before engaging in trading.
- Because there is no tracking of assets or cash in our traders they have no indication as to whether they have run out of cash. This is important because we need to control their behavior so they don't continuously buy or sell and tank the market (though they might anyways depending on how other traders behave). Add in a stochastic decision process like a random probability for whether they will actually buy or sell when the Moving Average conditions are met. If you expose this to the console via placing it in the
Globals.javaand tag it with an@Inputannotation you can modify the activity of the traders by adjusting this parameter (can be 0-1, larger number means a higher probability to trade in step). - The current implementation of the message
MarketPriceMessageused by the exchange to return market information does not support the current price, make sure to extend this message with a new field so the exchange also passes back the market price for recording the historical data. It is NOT recommended to place this in theGlobalStateas your agents will be simultaneously accessing this information and could cause issues due to parallelization.
Your actions sequence should be structured similar to the below:
run(
    Split.create(
        NoiseTrader.processInformation(),
        MomentumTrader.processInformation(),
        FundamentalTrader.processInformation()),
    Market.calcPriceImpact(),
    Split.create(
        NoiseTrader.updateThreshold(),
        MomentumTrader.updateMarketData(),
        FundamentalTrader.updateMarketData())
);
The above bit of code that you will implement should be contained in your Action that sends trades to the market. This behavior will have to be added to the step() method in your model class. You will need to use the Split.create() functionality in your run sequence to make it so that all your trader agents send orders to the exchange simultaneously.
Once you have created a new field on the MarketPriceMessage for market price, you will need to adjust the exchange behavior to include market price and set up the reception of that message on the momentum trader side. Follow the structure of the NoiseTrader and replicate the Action. (Make sure to record the market price and tick at each step in this step.)
Now compile your code and pull up the simulation in the console, it should look something like this:
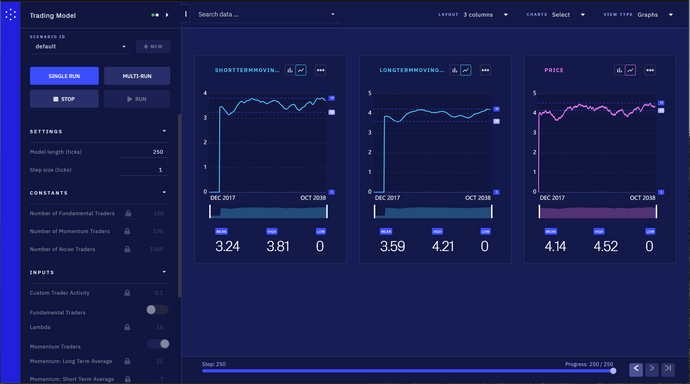
The market should now show momentum behavior in the price formation process.
Optional: Once you have implemented your moving average strategy you have the option to create a Boolean flag in the console to turn them on and off but this is a nice to have and not necessary to complete the assignment.
Section IV: Adding fundamental traders
The steps in the previous section for adding the trader and connected that new trader to the exchange should be followed before we implement the trading behavior.
This behavior will be slightly more complex than the behavior in our momentum trader.
Our FundamentalTrader will use a Relative Strength Index strategy, which we will refer to as RSI. The RSI strategy can be both adapted to a momentum or fundamental strategy. For our purposes we will use this as a fundamental strategy in our simulation.
The RSI will be a value between 0 and 100. If the RSI goes above the upper threshold, or the overbought threshold, then the asset has exceeded the range of it's perceived fundamental value and the trader will sell. On the contrary if the RSI dips below the lower threshold, or the oversold threshold, then our trader will buy. It will behave like an oscillator.
For more information on the theory behind RSI, take a look at this helpful link which is the source for the formulas and information below Relative Strength Index.
For our RSI indicator we will need to keep track of a couple variables:
- Look Back Period - This is the number of days of historical prices used to calculate average gains and losses (default = 14)
- Historical Prices - This will contain the information on the step and price at that step (it is recommended you create a
HashMap<Long, Double>to store your data where the key is the tick and the value is the price. At each step you will need to have the market price returned to the trader and stored in your map. - Overbought Threshold - If the RSI oscillator exceeds this value the the trader should sell. (default = 70)
- Oversold Threshold - If the RSI oscillator dips below this value the the trader should buy. (default = 30)
The RSI calculation is separated into 2 steps:
*Make sure to use the historical prices implementation from the momentum trader you implemented in the previous section.
The first part of our formula requires calculating the average gain and loss over a lookback period. The formula is below:

The average gain or loss used in the calculation is the average percentage gain or loss during a look-back period. The formula uses a positive value for the average loss.
Once there are 14 periods of data available, the second part of the RSI formula can be calculated. The second step of the calculation smooths the results.

This calculation can be a bit tricky to implement correctly. If you're having any issues or want to validate your results, compare your implementation to the answer key.
Once you've implemented your RSI logic, make sure to create a field on your FundamentalTrader.java class called rsi. Use an @Variable annotation to create a tile in the console.
Once you've completed these steps and implemented your Fundamental Trader with it's RSI strategy, you're console view should look something like this:
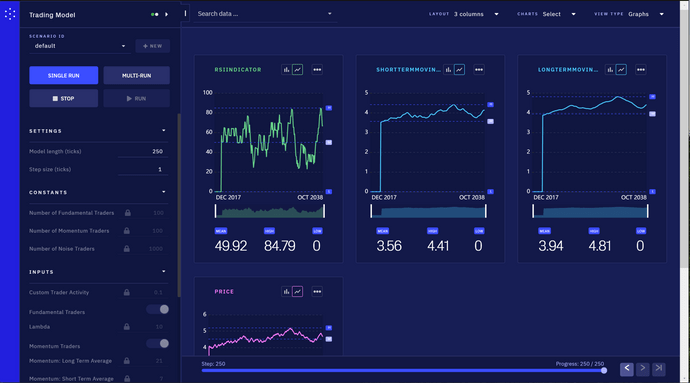
Your trader should use this RSI oscillator to determine whether the asset is overbought or oversold and trade based on the thresholds you defined above.
Optional: Implement a Boolean switch that will allow you to turn the traders on and off at your discretion
Section V: Adding your own trader (OPTIONAL)
Now that you've learned to add new trader agents to your simulation, you are all set up to implement your own trader into the system.
Use the guidance provided in the previous sections and your own knowledge / financial experience to either implement an entirely bespoke trading strategy or choose a well-known strategy and see how it affects the price formation process.
Conclusion
You have learned how to use the Simudyne SDK to create a more realistic synthetic market full of momentum, fundamental and noise traders.
This framework can be applied to a whole host of different problems that might be amenable to an agent-based approach. Financial markets are great examples of complex adaptive systems driven by human (sometimes machine) behavior. We could apply the approach of agent-based simulations to modelling credit card acquisition, lending portfolios that might be impacted by macro-economic factors, and even the spread of contagion like misinformation in a social network.
More of these introductory assignments will be added in the very near future so stay tuned for more exciting modelling challenges!