Build a Model
Last updated on 16th July 2024
Phase 1
Get started by learning how to build a very simple credit card model.
1. Create a Model
The Model interface wraps everything you define to build a simulation. First, create a new Java class in the same directory as Main.java in which you will implement the Model interface.
Insert implements Model after the class name and hit enter to automatically add the interface declaration at the top of the code.
CreditCard.java
import simudyne.core.Model;

public class CreditCard implements Model {
}
You will find an error near your model declaration. This is because you need to define the step() method.
2. Define step()
The step() method is called at each tick of the model. The calculations for every tick are specified inside the step() method.
Start by creating a variable called balance set to 400 and incremented by 20% at every tick.
CreditCard.java
 import simudyne.core.Model;
 import simudyne.core.annotations.Variable;

 public class CreditCard implements Model {
 @Variable(name = "Balance")
    public float balance = 400;

    public void step() {
    balance \*= 1.2;
    }
}3. Setup the Server
Before running the model, add it to the Main.java class to register on the Server.
Main.java
 import simudyne.nexus.Server;
 import org.example.models.CreditCard.CreditCard;

 public class Main {
    public static void main(String[] args) {
      Server.register("My Credit Card", CreditCard.class);
      Server.run();
    }
 }
4. Launch Console
Click the green play arrow or right click and run Main.java to control your model in the console.
or run using the command:
$ Run Main
$ simudyne-maven-java> mvn clean compile exec:java -Dexec.mainClass="Main" -s settings.xml
By default, the console can be found at localhost:8080.
Any models registered on the Server will appear in the model list.

5. Run Simulation
Once you've opened your model you will see a tile for the balance variable which you annotated earlier.

Use the arrows at the top of the console to control your simulation and watch your balance grow.
Phase 2
In order to improve the complexity of the model you will add:
- Spending
- Repayment
- Interest
1. Declare Parameters
Add the new parameters required for the extended model.
@Input(name = "Spending")
public boolean isSpending = true;

@Input(name = "Spending Amount")
public float spending = 250f;

@Input(name = "Repayment Amount")
public float repayment = 200f;

@Input(name = "Interest Rate")
public float interest = 0.03f;
2. Define Calculations
Add new variables and update the calculations in the step() method.
@Variable(name = "Interest Charge")
public float interest_charge() { return interest * balance; }

@Variable(name = "Balance Additions")
public float balance_additions() {
  return interest_charge() + (isSpending ? spending : 0);
}

public void step() {
  balance += balance_additions() - repayment;

  if (balance < 0) {
    balance = 0;
  }
}
3. Initialize Balance
To specify an initial value for balance, add the initializable parameter to its variable annotation.
@Variable(name = "Balance", initializable = true)
public long balance = 400;
4. Model Settings
Now we set up the annotations on the model, this will set the model time unit, and define the 'macro step' which is what you'll see on the console when you want to advance time by more than a tick, in this case, a year.
@ModelSettings(timeUnit = "MONTHS", macroStep = 12)
public class CreditCard implements Model {}
5. Final Model
In the console you will find inputs that you can control during the simulation. Your model class should look like this:
CreditCard.java
import simudyne.core.Model;
import simudyne.core.annotations.Input;
import simudyne.core.annotations.Variable;

@ModelSettings(timeUnit = "MONTHS", macroStep = 12)
public class CreditCard implements Model {

  @Input(name = "Spending")
  public boolean isSpending = true;

  @Input(name = "Spending Amount")
  public float spending = 250f;

  @Input(name = "Repayment Amount")
  public float repayment = 200f;

  @Input(name = "Interest Rate")
  public float interest = 0.03f;

  @Variable(name = "Balance", initializable = true)
  public long balance = 400;

  @Variable(name = "Interest Charge")
  public float interest_charge() { return interest * balance; }

  @Variable(name = "Balance Additions")
  public float balance_additions() {
    return interest_charge() + (isSpending ? spending : 0);
  }

  // Model Interface Methods

  public void step() {
    balance += balance_additions() - repayment;

    if (balance < 0) {
      balance = 0;
    }
  }
}
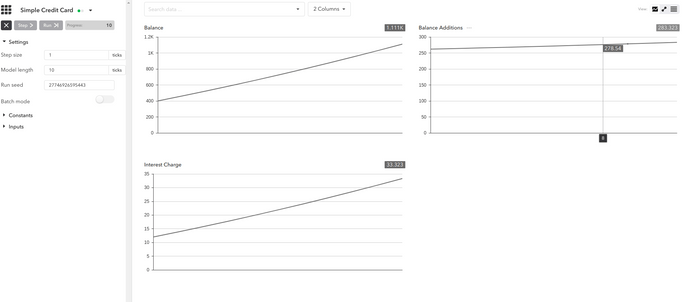
If you have followed our guidelines, your model output should closely resemble the following.
